Instructions for Version 3 (beta):
NetFlight 3 now supports two modes:
- Traditional NetFlight multiplayer, where all pilots fly their own planes and see each other flying around (if you are within line of sight, of course), and
- Shared cockpit, where two or more pilots fly the same plane.
The two modes are not mutually exclusive. In other words, both can be active simultaneously. Multiple pairs of pilots can fly around each other, practicing the pattern or flying in formation. This opens the doors to all kinds of instructional possibilities. Testing has even shown that shared cockpit works with more than two pilots in the same aircraft!
Which mode you fly will be determined by what you and your friend(s) want to accomplish during that flight session. These instructions will take you through the steps to do either mode, or both.
Installation
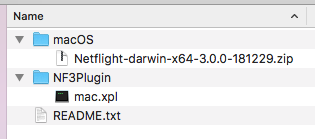
1. Download the files for your platform.
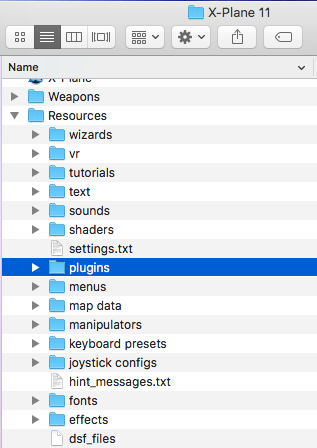
2. Copy the whole NF3Plugin folder into your X-Plane 11’s Resources/plugin folder. What you download will look something like this:
The destination looks like this:
For Windows 7 or later:
Double-click on “NetFlight-3.0.0 Setup.exe” to install NetFlight. Once it’s done installing, it will launch. It should set up a desktop icon and/or start menu item. Installing newly downloaded versions will overwrite the old one.
For macOS:
Unzip the Netflight-darwin-x64-3.0.0.zip file. While you can place this anywhere, the Applications folder is probably the best spot. Double-click on the resulting NetFlight.app to launch it.
** When you open it, macOS may complain about the app not being signed. You’ll need to go into the Security preference pane and click on “Open Anyway”. **
For Linux:
Not there yet, sorry.
Setup
This is the current layout of NetFlight 3’s options.

Before clicking on any of the NetFlight buttons, you must first go into X-Plane and set up a couple of things.
X-Plane Setup For everybody:
VR controllers, joysticks, yokes, pedals, etc. are required. Control via mouse is not presently supported.
For shared cockpit:
Shared cockpit has two flight modes: Primary and Secondary.
The Primary computer’s instance of X-Plane will act as the master, and will sync with X-Plane running on any connected Secondaries. You may want to make the most powerful computer act as the Primary. The Primary may also have better control of some of the cockpit items, so you’ll need to experiment with cockpit task assignments.
The software doesn’t care who is left seat and who is right seat—you and your co-pilot will determine that. By default, X-Plane places both of you in the left seat.
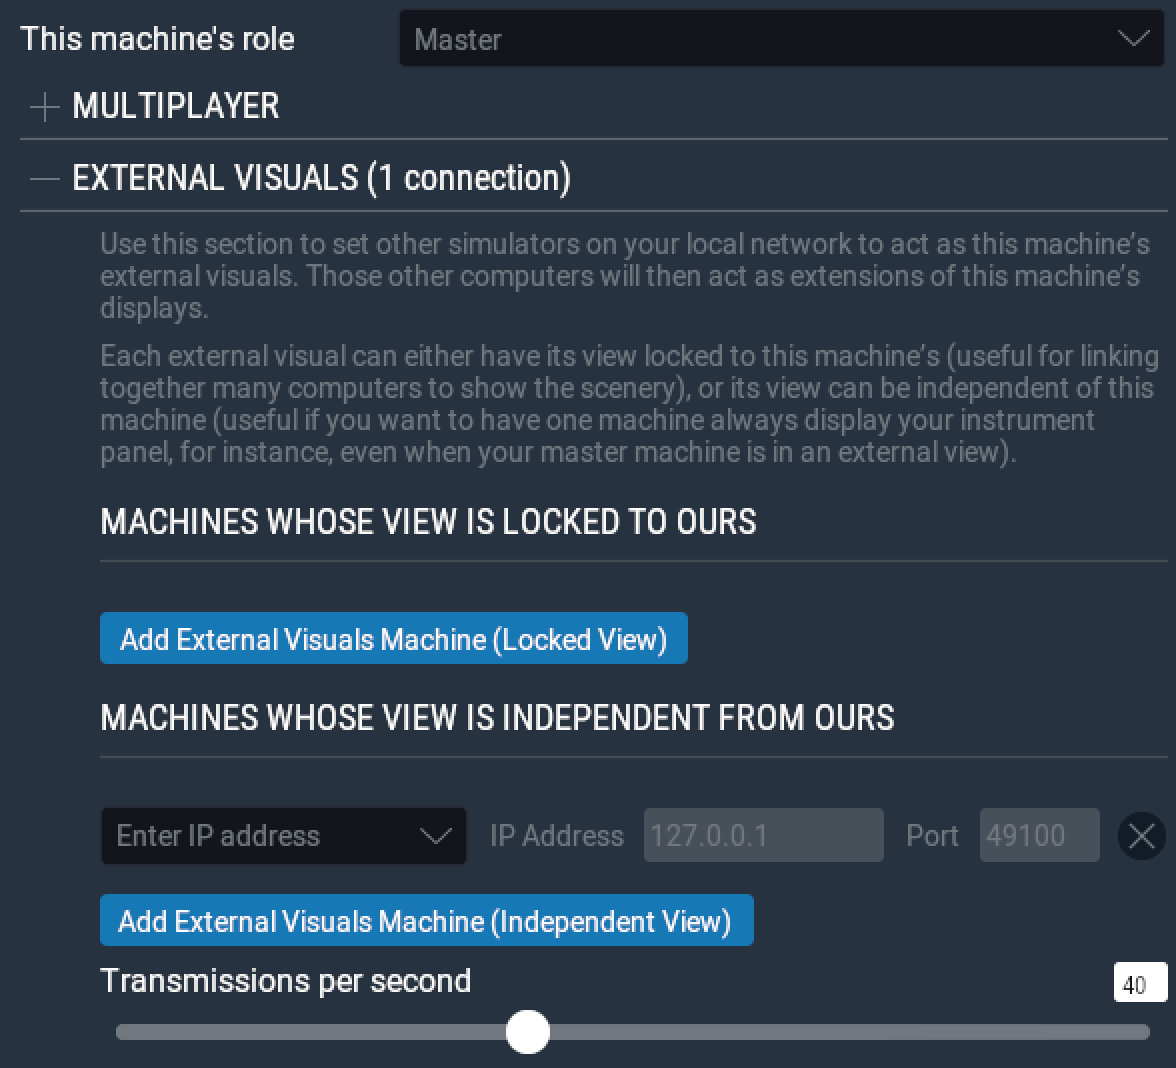
Before connecting as a Primary machine to NetFlight, you will need to set up the External Visuals feature on that machine only. To configure it, go to the Network tab in the sim’s settings. Click on External Visuals, then Add External Visuals Machine (Independent View) and enter the following IP address and port:
IP Address: 127.0.0.1 Port: 50100 <--- THIS IS NEW (23 Aug 2019)
Transmissions per second may be 30 or 40 by default. You can experiment with dropping it to 15 or 20 if you are experiencing latency issues.
For Secondary users, the External Visuals settings should be automatically configured for you, so you shouldn’t have to do anything to X-Plane. But if things don’t magically come up…
Follow the same instructions as Primary above, but change “This machine’s role” to “External Visuals”, and set the IP address and port for the master to the same settings as listed for the master above.
For Multiplayer (multiple planes, a.k.a. traditional NetFlight):
(Required for all users in order to see other aircraft besides your own.)
In X-Plane 11, go to Flight Configuration, click on the AI Aircraft button at the top, and enable 2-5 aircraft at least. Set them to whatever planes you like.
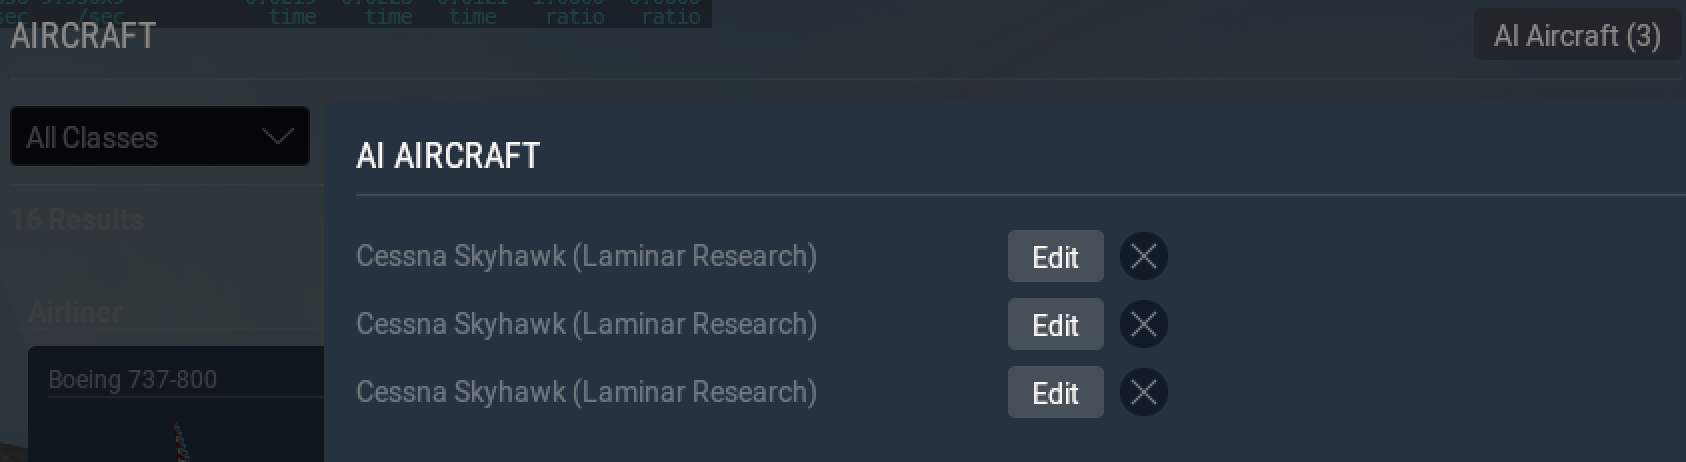
For this build of NetFlight, all Solo/Primary computers will have to manually match these planes to those that the others are flying (auto-detect isn’t implemented yet), or just leave them at your favorite planes. The worst that will happen is that they’ll be positioned funny if you choose a plane that’s bigger or smaller than what the other pilots are actually flying.
Secondaries will get their multiplayer aircraft data from the Primary. All Secondary sims will need to have the same X-Plane aircraft installed in the same locations as their Primary in order to see the correct multiplayer aircraft.
Configuring NetFlight and Flying
With X-Plane configured, you are now ready to set up NetFlight and fly with other pilots.
For Solo Pilots:
1. Enter your callsign. The callsign doubles as your handle/username for now. Actual usernames and passwords aren’t used yet.
2. Enter the name of a channel. At present, “main” is the default, and you and your fellow pilots can join using any channel name that you like.
3. You can skip the cockpit ID, as you won’t be using it.
4. Click on Solo/Primary; skip 4a.
5. Click Connect to Netflight.
If your controls aren’t responding, you may have to click Start then Stop under Enable Shared Cockpit (step 4a).
For Shared Cockpit:
You and your co-pilot should have decided by now which of your computers will be the Primary one and configured X-Plane accordingly on that machine.
1. Both users enter their (unique) callsigns/handles.
2. Enter the same flight channel.
3. Use the same Cockpit ID. Usually you’ll use the Primary user’s auto-generated ID.
4. Primary user selects Solo/Primary; Secondary user selects Secondary.
5. Both users start Shared Controls.
6. Both users connect to the server.
In shared cockpit mode, the sim auto-detects who is controlling the plane. Just like in real life, you will have to work out who is in charge with your co-pilot (i.e. “My Plane” “Your Plane” “My Plane”) via voice or text comms.
Most mapped buttons and in-sim touchable controls should “just work.” On Secondary machines, press-and-hold does NOT work (yet), so you will have to click multiple times for doing things like setting the heading bug or configuring autopilot. Some axes cannot be controlled by the mouse on either computer. We are still looking into this.
If you have a “chatty” joystick, you may need to adjust your sensitivity settings. Joystick chatter will cross the wire to the other side while the other pilot is flying and makes it difficult to fly straight.
For everybody:
Once connected, you should see a list of pilots, their channels, their Cockpit ID, and which AI aircraft slot they’ve been assigned to on your computer. The slot number corresponds to the AI Aircraft they are controlling, so you can go into the AI settings and assign their plane manually.
Comms
We’ve created a Discord channel for text and voice chat (100-use limit as of 21 Dec 2018). Please use Discord if you fly in the “main” channel.
Feedback
This is a very early release to expose bugs and weakenesses in the implementation. Feedback is not only appreciated, it’s NEEDED in order to make this the best experience possible.
The forum for discussing problems and features is on Spectrum.
Comments submitted there usually get emailed to me.
Instructions for Version 2:
-
- Download, unzip, and install the plugin into your X-Plane Resources directory (usually in Plugins) and (re)start X-Plane.
-
- Consider a username, password, and callsign. (It doesn’t matter what they actually are, since the system doesn’t currently check them.) You will enter these login credentials in the NetFlight plugin settings window once X-Plane starts. This window is found under the Plugins->NetFlight submenu.
Notes:
- Shared cockpit features (crew ID and position) do not work yet (they were put there for testing). Leave crew ID blank and stay in position 1 (a.k.a. pilot, PIC, left seat).
- NetFlight requires at least as many AI (artificially intelligent) aircraft to be enabled as there are participants on the server. While X-Plane supports up to 20, it can cause a drain on some CPU and GPU combinations. A minimum of between 5 to 10 is recommended. There are rarely more than 10 users on the server at any given time.
- The TAB key toggles the chat window between “on with typing focus,” “on without typing focus,” and “hide” (automatically turns on for 10 seconds when messages arrive). There is apparently some conflict with X-Plane 11 on the TAB key. You may have to reassign its purpose.
- The Plane window shows network status and list of pilots and airplanes and can be toggled on and off from the NetFlight plugin menu.
- The ATC map page shows pilot location and aircraft file name.
- It is important that everyone in your group has the same X-Plane aircraft file (.acf) in the same directory structure in order for the plugin to “automatically” find and apply the right airplane. Otherwise, you can manually go into “Aircraft and Situations” and change the aircraft in your buddy’s slot to whatever plane you want it to be.